
Rough guide to using default programs (Paint / Preview) to resize a picture
The latest Perdix feature allows you to download a 320 (width) by 240 (height) picture. Since Shearwater Desktop is unable to resize the image internally, you must use an external program to resize your image to the appropriate size.
Mac and Windows both come with a program that allows you to manipulate your image in such a way. This is a quick guide on how to use these tools to make your image fit on your Perdix. Follow the Computer specific instructions (Either: Mac or Windows) to resize your image. Once the image is resized and saved, follow the upload procedure section below.
Computer Specific Step:
Windows:
- 1. Search for: “Paint” in your start menu and open the application.
- 2. In Paint, go to: File -> Open -> Select the image you want to use on your Perdix
-
3. Now select “Resize” located at the top left of the screen. The image below has a red square around it:
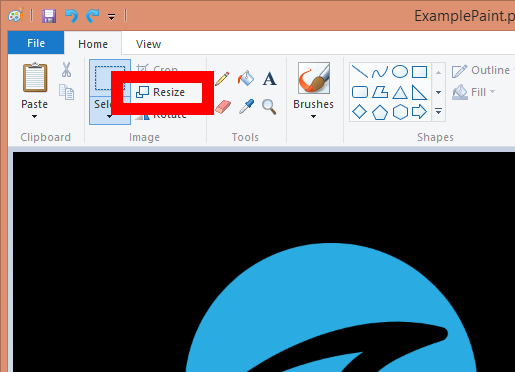
- 4. We want to make the Image 320 x 240 pixels. So select the Pixels radio button at the top (As shown in the picture below).
-
5. Uncheck “Maintain aspect ratio” and input 320 into the “Horizontal” box and 240 into the “Vertical” box. Verify the picture below to ensure you have the same information filled out.

- 6. Finally, save the file to a memorable location to later upload. (File -> Save As)
Mac:
- 1. Open the Image you want to upload to your Perdix using preview. (Right click on them and select “Open with Preview.”)
- 2. In preview, go to: Tools -> Adjust Size. In the menu bar.
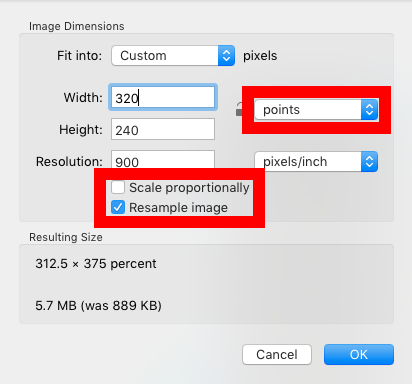
- 3. 320 x 240 should be an option already in the “Fit into” pixels tab. Select that if you have the option.
- 4. Otherwise select custom, uncheck the “Scales Proportionally” in the bottom, and then manually enter 320 for Width and 240 for height. You may need to change the Units to “Points”. Reference the right most Red box in the image below.
- 5. Verify that your information looks similar to the picture below. Select :“OK”.
-
6. Save your file to a memorable location to later be uploaded using Shearwater Desktop. (File -> Export)
Upload Procedure:
- 1. Open Shearwater Desktop, make sure you are on version 2.5.4
-
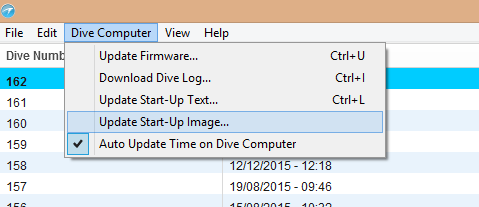
2. Go to: Dive Computer -> Update Start-Up Image
- 3. In the Update Start-Up Image window, select: “Import custom image”
- 4. Click: “Browse” and search for your newly formatted image from the steps above.
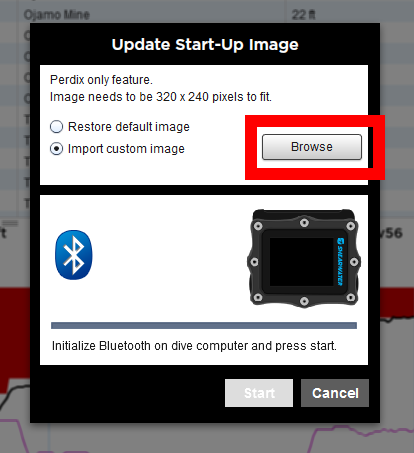
- 5. Once your image is selected, start a Bluetooth connection on your Perdix. (Example: Dive Log -> Upload Log)
- 6. Now in Shearwater Desktop, click: “Start” in the Update Start-Up Image window.
Your image upload should begin. If anything in this procedure confuses you, or if you run into any difficulties connecting, you can always talk to me at: support@shearwater.com. I am happy to help.


